poniedziałek, 22 sierpnia 2022

Mikrotik - WireGuard Client, czyli jak zrobić zdalny dostęp do sieci domowej ?

 Siemanko. Dzisiaj opiszę jak w szybki sposób nawiązać połączenie WireGuard do swojej sieci domowej.

Co potrzebujemy:
- publiczny adres IP (może być stały lub przez DDNS)
- wygenerować konfigurację do WireGuard (https://www.wireguardconfig.com/)

1. Przechodzimy do strony z generowaniem konfiguracji i wpisujemy w polu "Random seed" coś co nam ułatwi wygenerować dodatkowych klientów na przyszłość.


Ja wybrałem seed: WG-CONFIG Twój najlepiej jak będzie taki który łatwo zapamiętasz. Następnie niżej klikamy przycisk Generate Config.

Teraz logujemy się na naszego Mikrotika i w pierwszym kroku dodajemy interfejs WireGuard. Klikamy w menu po lewej kolejno 1. Wireguard,  następnie klikamy 2 w plusik aby dodać interfejs, nadajemy nazwę naszemu interfejsowi oraz zatwierdzamy 3. Apply


Pamiętaj żeby przed naciśnięciem Apply wkleić Private Key który wygenerowaliśmy na stronie.


Całość powinna wyglądać tak jak poniżej.


Teraz musimy przypisać adres IP dla naszego interfejsu. Robimy to klikając w IP -> Addresses


Ja wybrałem adresację 192.168.40.1/24 u ciebie może być inna dowolna.

Jak już mamy poprawnie skonfigurowany interfejs WireGuard zajmiemy się dodawaniem klientów. Analogicznie jak dla interfejsu z strony generatora kopiujemy Public Key dla klienta i wklejamy.


Fantastycznie już mamy stworzony poprawnie serwer WireGuard i klienta. Przejdźmy do Firewalla.
Aby poprawnie dodać rulki Firewallowe przechodzimy w menu do IP -> Firewall i klikamy add w Filter Rules.


Dodajemy rulkę która akceptuje pakiety UDP na port naszego interfejsu WireGuard który dodaliśmy wcześniej czyli 13231.


Brawo teraz już tylko spreparować odpowiedni plik konfiguracji. Kopiujemy wygenerowany konfig do notatnika i przerabiamy go trochę.


Dla bloku [Interface] ustawiamy adres naszego klienta np. kolejny po adresie naszego serwera. Private Key zostawiamy bez zmian. Dla bloku [Peer] PublicKey zostawiamy bez zmian. Dodajemy AllowedIPs dla sieci naszego tunelu WireGuard oraz sieci lokalnej do której mamy mieć dostęp. Jako Endpoint ustawiamy domenę pod którą jest nasz MikroTik lub adres IP. Zapisujemy nasz konfig jako np. WG-Client.conf

Teraz na naszym kliencie pobieramy https://www.wireguard.com/install/ i instalujemy Klienta WireGuard zgodnego z naszym systemem operacyjnym. Klikamy dodaj tunel i wybieramy nasz plik z konfiguracją.

Gratuluje stworzyłeś szybki i wydajny serwer WireGuard i dodałeś klienta/ Jeżeli masz pytania czy sugestie zapraszam do dyskusji.


wtorek, 5 kwietnia 2022

Darmowa domena eu.org w CloudFlare w 5 krokach

 Chcesz za darmo domene? Chcesz aby była odporna na DDOSy ?

No to zaczynamy...

1) Zakładamy konto na stronie nic.eu.org


Po założeniu konta klikamy "New domain"


Po złożeniu requestu na domenę musimy czekać... Trwa to średnio do około miesiąca czasu. 

2) Kolejnym krokiem będzie założenie konta na https://www.cloudns.net/ i dodanie zony. 


W tym celu klikamy na "create zone" i wybieramy opcję "Master zone"
3) Teraz cofamy się do nic.eu.org i w ustawieniach domeny dodajemy Nameserwery które wskaże nam CloudDNS.


Po wpisaniu serwerów klikamy "Submit" W wyniku tej operacji powinniśmy uzyskać taki oto wynik lub podobny informujący o braku błędów.


4) Teraz przechodzimy do panelu CloudFlare i klikamy "Add Site"


Teraz tylko wybieramy darmowy plan i przechodzimy do uzupełniania strefy DNS


5) Teraz tylko podmieniamy DNSy na nic.eu.org w Nameserwerach naszej domeny tym razem na te które wskaże CloudFlare.


Nie zapomnij usunąć zony z CloudDNS.

To wszystko ;)


sobota, 26 marca 2022

RecallBox - Instalujemy skrypt obudowy Argon40 One


1) Pobieramy skrypt "argonone-setup-recalbox.sh" z strony: https://github.com/KlimasTech/recallbox

2) Kopiujemy go w RecallBox'ie do folderu: /recalbox/share

3) Uruchamiamy skrypt komendą:

bash argonone-setup-recalbox.sh


 4) Zostaje nam tylko zrestartować naszego RecallBox'a i skonfigurować naszego ARGONA40


Teraz nie musimy się obawiać że nasza Malinka się będzie przegrzewać.

sobota, 5 marca 2022

Instalacja serwera TeamSpeak 3 + Baza MySQL Debian 8 + AntyCrash + AutoBackup


Dzisiaj podzielę się z wami wiedzą jak poprawnie zainstalować serwer TeamSpeak3 wykorzystując do tego bazę danych MYSQL oraz dodatkowo wzbogacimy nasz serwer o system AntyCrash i AutoBackup.


1. Przygotowanie systemu i instalacja niezbędnych pakietów
apt update
apt upgrade -y
apt install nano ufw htop curl wget fontconfig-config fonts-dejavu-core \
libfontconfig1 screen libgd3 libjbig0 liblua5.1-0 libperl5* libtiff5 libxpm4 \
libxslt1.1 libpython-stdlib libpython2.7-minimal libpython2.7-stdlib zip \
python-minimal python2.7 python2.7-minimal fcgiwrap ssl-cert libglib2.0-0 \
x11vnc xvfb libxcursor1 ca-certificates bzip2 python libossp-uuid16 unzip sudo -y
update-ca-certificates


2. Instalacja serwera www, bazy danych i interfejsu phpmyadmin
apt install php5-fpm php5-mysql php5-mcrypt mysql-server phpmyadmin -y


Przy instalacji phpmyadmin wybieramy apache.

Rysunek 1 - Instalacja phpmyadmin

3. Dodajemy nowego użytkownika do bazy logując się do panelu phpmyadmin

Wywołujemy w przeglądarce:
http://ip-servera/phpmyadmin


Rysunek 2 - Dodawanie użytkownika i bazy danych

Rysunek 3 - Dodanie użytkownika wraz z bazą danych


3. Serwer TeamSpeak 3

3.1 Instalacja
adduser teamspeak3 --disabled-login -q
echo "teamspeak3 ALL=NOPASSWD: ALL" >> /etc/sudoers
su teamspeak3
cd $HOME
wget http://dl.4players.de/ts/releases/3.0.13.6/teamspeak3-server_linux_amd64-3.0.13.6.tar.bz2
tar xvf teamspeak3-server_linux_amd64-3.0.13.6.tar.bz2
rm teamspeak3-server_linux_amd64-3.0.13.6.tar.bz2
mv /home/teamspeak3/teamspeak3-server_linux_amd64 /home/teamspeak3/server/


3.2 Konfiguracja serwera TeamSpeak 3
cd /home/teamspeak3/server
sudo ln -s /home/teamspeak3/server/redist/libmariadb.so.2 /lib/x86_64-linux-gnu/libmariadb.so.2
cp redist/libmariadb.so.2 ./

Tworzymy plik konfiguracyjny

nano /home/teamspeak3/server/ts3server.ini

machine_id=
default_voice_port=9987
voice_ip=0.0.0.0
liscensepath=
filetransfer_port=30033
filetransfer_ip=0.0.0.0
query_port=10011
query_ip=0.0.0.0
query_ip_whitelist=query_ip_whitelist.txt
query_ip_blacklist=query_ip_blacklist.txt
dbplugin=ts3db_mariadb
dbpluginparameter=ts3db_mariadb.ini
dbsqlpath=sql/
dbsqlcreatepath=create_mariadb/
dblogkeepdays=90
logpath=logs
logquerycommands=0
dbclientkeepdays=30


Zapisujemy CTRL + O, wychodzimy CTRL + X

oraz plik: ts3db_mariadb.ini

nano /home/teamspeak3/server/ts3db_mariadb.ini


[config]
host=localhost
port=3306
username=teamspeak3
password= ## TWOJE HASŁO !!
database=teamspeak3
socket=/var/run/mysqld/mysqld.sock


cd /home/teamspeak3/server
ldd libts3db_mariadb.so
./ts3server_minimal_runscript.sh start inifile=ts3server.ini


Zanotuj sobie Dane dostepowe do “server query” oraz token administratora do stworzonej instancji.
Po pierwszym uruchomieniu warto zalogowac sie do swojego serwera, aby przypisać sobie uprawnienia.

Po zalogowaniu zamknij proces ( CTRL + C ) i przejdź do kolejnego kroku który wykonujemy z poziomu konta root.

3.4 Skrypt uruchamiający serwer przy starcie
wget http://pliki.linuxiarz.pl/04-2016/ts3 -O /etc/init.d/ts3
chmod +x /etc/init.d/ts3
update-rc.d ts3 defaults
service ts3 start


3.5 Anty-Crash serwera TeamSpeak3
wget http://pliki.linuxiarz.pl/04-2016/antycrash.sh -O /home/teamspeak3/server/antycrash.sh
chmod +x /home/teamspeak3/server/antycrash.sh
(crontab -u teamspeak3 -l; echo "* * * * * bash /home/teamspeak3/server/antycrash.sh >> /dev/null") | crontab -u teamspeak3 -

VMWare do lamusa Instaluj unRAID !

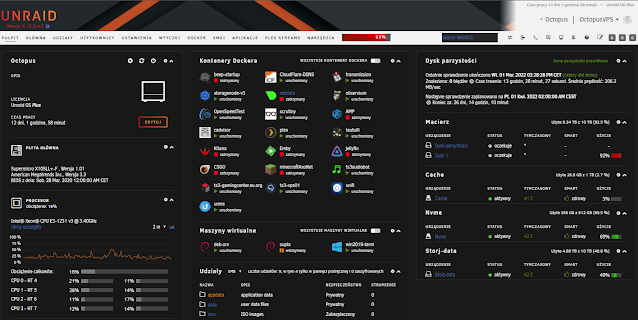
 Witajcie po dłuższej przerwie. Chciałbym się z wami podzielić moimi spostrzeżeniami dlaczego przeszedłem na system unRaid. Jak można wyczytać z poprzednich postów w WMWare coraz mniej żeczy działało, nie miało już wsparcia a ostatnio nawet nie wiedziałem że mi bateria w kontrolerze RAID umarła bo w WMWare usunięto, tak usuniętyo wsparcie świetnego kontrolera RAID marki LSI. Plus dla corpo.... Długo szukałem i znalazłem nowy lepszy system i z większymi możliwościami. Już na wstępie system licencji jest atrakcyjny. Płacimi jednorazowo za obsługę ilości dysków w macierzy a nie za subskrypcję którą trzeba co rok odnawiać :( Zobaczcie sami:


Uważam że to uczciwa cena jak za jednorazowy zakup. Po instalacji dodajemy dyski do macierzy która jest o niebo lepsza niż tradycyjny RAID 5 czy 6. Dodatkowo używając dysków SSD jako cache przyspieszymy działanie na plikach a w nocy kiedy nikt nie korzysta z plików są one przenoszone na dyski talerzowe.


Jak dla mnie jest to rozwiązanie idealne. Nie trzeba do tego jakiegoś drogiego i specjalnego kontrolera dysków. Wystarczy taki który ma tryb HBA lub zwykłe porty sata na płycie głównej.

Po zainstalowaniu unRaid i skonfiguowaniu macierzy możemy przystapić do instalacji wirtualnych maszyn i kontenerów Dockera. Tak dobrze czytacie Dockera! Mamy menu Aplikacji gdzie mamy gotowe przygotowane instalacje dokerów popularnych aplikacji takich jak np. TeamSpeak, NGING itp. Dodatkowo mamy dostęp do dużej ilości pluginów usprawniających i automatyzujących pracę serwera.


Czyż nie fajnie mieć panel zarządzania całym serwerem przez www ? WMWare nie daje nam takich możliwości nawet w najwyższej opcji subskrypcji. Polecam zainteresować się unRAID jeżeli chcesz mieć serwer na dopalaczach. Ja swojego unRAIDA już użytkuje od ponad roku i jestem zadowolony. Ciągłe aktualizacje i dbanie dużej społeczności o ilość aplikacji i wtyczek sprawia że mamy naprawdę potężny serwer. Tyle ode mnie, wypróbuj wersję Trial ;) Jeżeli masz pytania lub chcesz abym napisał coś więcej napisz komentarz.


wtorek, 14 lutego 2017

[ESXI] R.I.P vSphere Client C#


Dopiero teraz zauważyłem... Ja nadal usilnie starego managera używam i stad narobiłem sobie ambarasu z wirtualnym dyskiem. Stworzyłem klientem HTML dysk 8TB a za jakiś czas starym klientem próbowałem mu zmienić nazwę... Co skutkowało prawie zawałem na miejscu bo tego dysku nie szło przypisać do wirtualnej maszyny.... Restart ESXI pomógł na tyle że dało sie dopiąć dysk. Dysk ma zajete 2,28TB z 8TB ale np w NAKIVO pokazuje ze ta vmka ma dysk 2,28TB nie 8TB chociaz w VMce widnieje 8TB. Także UWAŻAJCIE. ODINSTALUJCIE vSphere po aktualizacji ESXI do wersji 6.5 ;)

niedziela, 5 lutego 2017

[Ubiquity] Router EdgeMax Lite - Powrót do żywych

Witajcie jak tytuł wpisu mówi będziemy dzisiaj wskrzeszać router. Tak to nie są żarty. Zakupiłem router za 50zł który jak się okazało nie odpowiada na PING oraz nie ładuje się GUI. Resetowanie do ustawień fabrycznych też na nic się nie zdało. Co tu zrobić myślę... Ostatnią rzeczą jaką mogłem zrobić to dostać się do routera przez port "console". Na szczęście razem z routerem kupiłem przewód RJ45 do RS232. OK wszystko mam ale gdzie go podłączyć? Przypomniałem sobie że chyba na płycie głównej w komputerze posiadam taki port ale potrzebuje gniazda którego niestety nie znalazłem. Z pomocą przyszedł mój serwer wirtualizacji w domu. Pierwsze co zrobiłem to przypisałem znajdujące się w serwerze "serial porty" do wirtualnego Linuxa. Kolejnym krokiem było znaleźć jakiś program do połączenia konsolowego. Padło na minicom który instalujemy poleceniem:

apt-get install minicom

Uruchamiamy program w trybie konfiguracji.

sudo minicom -s

Rysunek 1 - Program minicom
 Następnie należy przejść do konfiguracji portu szeregowego. W moim przypadku jest to /dev/ttyS0.

Rysunek 2 - Konfiguracja portu szeregowego
Aby wylistować dostępne porty szeregowe należy użyć komendy "sudo dmesg | grep tty".

Rysunek 3 - Listowanie portów szeregowych.

Teraz podłączamy nasz router przewodem console do komputera. W moim przypadku jest to wirtualny Linux Debian. Jeżeli wszystko dobrze ustawiłeś po uruchomieniu programu komendą "sudo minicom" powinieneś uzyskać połączenie z konsolą EdgeMax.

Looking for valid bootloader image....
Jumping to start of image at address 0xbfc80000

U-Boot 1.1.1 (UBNT Build ID: 4493936-g009d77b) (Build time: Sep 20 2012 - 15:48:51)
BIST check passed.
UBNT_E100 r1:2, r2:14, serial #: DC9FDB286268
Core clock: 500 MHz, DDR clock: 266 MHz (532 Mhz data rate)
DRAM:  512 MB
Clearing DRAM....... done
Flash:  4 MB
Net:   octeth0, octeth1, octeth2
USB:   (port 0) scanning bus for devices... 1 USB Devices found
       scanning bus for storage devices...
  Device 0: Vendor:          Prod.: USB DISK 2.0     Rev: PMAP
            Type: Removable Hard Disk
            Capacity: 3700.6 MB = 3.6 GB (7579008 x 512)
 0 
reading vmlinux.64
........................................
8081560 bytes read
argv[2]: coremask=0x3
argv[3]: root=/dev/sda2
argv[4]: rootdelay=15
argv[5]: rw
argv[6]: rootsqimg=squashfs.img
argv[7]: rootsqwdir=w
argv[8]: mtdparts=phys_mapped_flash:512k(boot0),512k(boot1),64k@3072k(eeprom)
ELF file is 64 bit
Allocating memory for ELF segment: addr: 0xffffffff81100000 (adjusted to: 0x1100000), size 0x7f2a90
Allocated memory for ELF segment: addr: 0xffffffff81100000, size 0x7f2a90
Processing PHDR 0
  Loading 79a980 bytes at ffffffff81100000
  Clearing 58110 bytes at ffffffff8189a980
## Loading Linux kernel with entry point: 0xffffffff81105cd0 ...
Bootloader: Done loading app on coremask: 0x3
Linux version 2.6.32.13-UBNT (ancheng@ubnt-builder2) (gcc version 4.3.3 (Cavium Networks Version: 2_0_0 build 99) ) #1 SMP Wed Oct 24 01:08:06 PDT 2012
CVMSEG size: 2 cache lines (256 bytes)
Cavium Networks SDK-2.0
CPU revision is: 000d0601 (Cavium Octeon+)
Checking for the multiply/shift bug... no.
Checking for the daddiu bug... no.
Determined physical RAM map:
 memory: 0000000000034000 @ 000000000186c000 (usable after init)
 memory: 0000000006800000 @ 0000000001900000 (usable)
 memory: 0000000007c00000 @ 0000000008200000 (usable)
 memory: 000000000fc00000 @ 0000000410000000 (usable)
Wasting 350112 bytes for tracking 6252 unused pages
Zone PFN ranges:
  DMA32    0x0000186c -> 0x00100000
  Normal   0x00100000 -> 0x0041fc00
Movable zone start PFN for each node
early_node_map[4] active PFN ranges
    0: 0x0000186c -> 0x000018a0
    0: 0x00001900 -> 0x00008100
    0: 0x00008200 -> 0x0000fe00
    0: 0x00410000 -> 0x0041fc00
Cavium Hotplug: Available coremask 0x0
PERCPU: Embedded 10 pages/cpu @a8000000020b8000 s10624 r8192 d22144 u65536
pcpu-alloc: s10624 r8192 d22144 u65536 alloc=16*4096
pcpu-alloc: [0] 0 [0] 1 
Built 1 zonelists in Zone order, mobility grouping on.  Total pages: 63895
Kernel command line:  bootoctlinux $loadaddr coremask=0x3 root=/dev/sda2 rootdelay=15 rw rootsqimg=squashfs.img rootsqwdir=w mtdparts=phys_mapped_flash:512k(boot0),512k(boot1),64k@3072k(eeprom) console=ttyS0,115200
PID hash table entries: 1024 (order: 1, 8192 bytes)
Dentry cache hash table entries: 32768 (order: 6, 262144 bytes)
Inode-cache hash table entries: 16384 (order: 5, 131072 bytes)
Primary instruction cache 32kB, virtually tagged, 4 way, 64 sets, linesize 128 bytes.
Primary data cache 16kB, 64-way, 2 sets, linesize 128 bytes.
Memory: 483444k/491728k available (3478k kernel code, 8064k reserved, 4118k data, 208k init, 0k highmem)
Hierarchical RCU implementation.
NR_IRQS:152
Calibrating delay loop (skipped) preset value.. 1000.00 BogoMIPS (lpj=5000000)
Security Framework initialized
Mount-cache hash table entries: 256
Checking for the daddi bug... no.
SMP: Booting CPU01 (CoreId  1)...
CPU revision is: 000d0601 (Cavium Octeon+)
Brought up 2 CPUs
NET: Registered protocol family 16
bio: create slab <bio-0> at 0
SCSI subsystem initialized
usbcore: registered new interface driver usbfs
usbcore: registered new interface driver hub
usbcore: registered new device driver usb
Switching to clocksource OCTEON_CVMCOUNT
NET: Registered protocol family 2
IP route cache hash table entries: 2048 (order: 2, 16384 bytes)
TCP established hash table entries: 8192 (order: 5, 131072 bytes)
TCP bind hash table entries: 8192 (order: 5, 131072 bytes)
TCP: Hash tables configured (established 8192 bind 8192)
TCP reno registered
NET: Registered protocol family 1
/proc/octeon_perf: Octeon performace counter interface loaded
octeon_wdt: Initial granularity 5 Sec.
squashfs: version 4.0 (2009/01/31) Phillip Lougher
Registering unionfs 2.5.11 (for 2.6.32.55)
msgmni has been set to 944
alg: No test for stdrng (krng)
io scheduler noop registered
io scheduler cfq registered (default)
Serial: 8250/16550 driver, 2 ports, IRQ sharing disabled
serial8250.0: ttyS0 at MMIO 0x1180000000800 (irq = 58) is a OCTEON
console [ttyS0] enabled
loop: module loaded
ohci_hcd: USB 1.1 'Open' Host Controller (OHCI) Driver
OcteonUSB: Detected 1 ports
OcteonUSB OcteonUSB.0: Octeon Host Controller
OcteonUSB OcteonUSB.0: new USB bus registered, assigned bus number 1
OcteonUSB OcteonUSB.0: irq 80, io mem 0x00000000
usb usb1: configuration #1 chosen from 1 choice
hub 1-0:1.0: USB hub found
hub 1-0:1.0: 1 port detected
OcteonUSB: Registered HCD for port 0 on irq 80
Initializing USB Mass Storage driver...
usbcore: registered new interface driver usb-storage
USB Mass Storage support registered.
usbcore: registered new interface driver libusual
Probing USB hub...
hub 1-0:1.0: USB hub found
hub 1-0:1.0: 1 port detected
TCP cubic registered
NET: Registered protocol family 17
NET: Registered protocol family 15
L2 lock: TLB refill 256 bytes
L2 lock: General exception 128 bytes
L2 lock: low-level interrupt 128 bytes
L2 lock: interrupt 640 bytes
L2 lock: memcpy 1152 bytes
Bootbus flash: Setting flash for 4MB flash at 0x1f800000
phys_mapped_flash: Found 1 x16 devices at 0x0 in 8-bit bank
 Amd/Fujitsu Extended Query Table at 0x0040
phys_mapped_flash: Swapping erase regions for broken CFI table.
number of CFI chips: 1
cfi_cmdset_0002: Disabling erase-suspend-program due to code brokenness.
3 cmdlinepart partitions found on MTD device phys_mapped_flash
Creating 3 MTD partitions on "phys_mapped_flash":
0x000000000000-0x000000080000 : "boot0"
0x000000080000-0x000000100000 : "boot1"
0x000000300000-0x000000310000 : "eeprom"
Waiting 15sec before mounting root device...
hub 1-0:1.0: activate --> -22
usb 1-1: new high speed USB device using OcteonUSB and address 2
usb 1-1: configuration #1 chosen from 1 choice
scsi0 : SCSI emulation for USB Mass Storage devices
scsi 0:0:0:0: Direct-Access              USB DISK 2.0     PMAP PQ: 0 ANSI: 4
sd 0:0:0:0: [sda] 7579008 512-byte logical blocks: (3.88 GB/3.61 GiB)
sd 0:0:0:0: [sda] Write Protect is off
sd 0:0:0:0: [sda] Assuming drive cache: write through
 sda: sda1 sda2
sd 0:0:0:0: [sda] Assuming drive cache: write through
sd 0:0:0:0: [sda] Attached SCSI removable disk
kjournald starting.  Commit interval 5 seconds
EXT3-fs warning: maximal mount count reached, running e2fsck is recommended
EXT3 FS on sda2, internal journal
EXT3-fs: recovery complete.
EXT3-fs: mounted filesystem with writeback data mode.
VFS: Mounted root (unionfs filesystem) on device 0:12.
Freeing unused kernel memory: 208k freed
Algorithmics/MIPS FPU Emulator v1.5
INIT: version 2.88 booting
SQUASHFS error: zlib_inflate error, data probably corrupt
SQUASHFS error: squashfs_read_data failed to read block 0x60
SQUASHFS error: Unable to read data cache entry [60]
SQUASHFS error: Unable to read page, block 60, size d10d
SQUASHFS error: Unable to read data cache entry [60]
SQUASHFS error: Unable to read page, block 60, size d10d
SQUASHFS error: Unable to read data cache entry [60]
SQUASHFS error: Unable to read page, block 60, size d10d
SQUASHFS error: Unable to read data cache entry [60]
SQUASHFS error: Unable to read page, block 60, size d10d
SQUASHFS error: Unable to read data cache entry [60]
SQUASHFS error: Unable to read page, block 60, size d10d

INIT: cannot execute "/etc/init.d/rcS"
INIT: Entering runlevel: 2
SQUASHFS error: Unable to read data cache entry [60]
SQUASHFS error: Unable to read page, block 60, size d10d

INIT: cannot execute "/etc/init.d/rc"
Welcome to EdgeOS (none) ttyS0
By logging in, accessing, or using the Ubiquiti product, you
acknowledge that you have read and understood the Ubiquiti
License Agreement (available in the Web UI at, by default,
http://192.168.1.1) and agree to be bound by its terms.
(none) login: 

Na czerwono zaznaczyłem wpisy informujące o tym że nie można odczytać danych. Sprawa jest prosta, pendrive jest uszkodzony. Rozwiązaniem jest wymiana pendrive. Aby sprawdzić kompatybilność urządzenie wystarczy zainstalować nowy penndrive i zobaczyć czy go wykrywa. Jeżeli tak to przystępujemy do działania.

Restartujemy router i podczas ładowania systemu naciskamy dowolny klawisz kilkukrotnie aby przejść do lini poleceń.


Ustawiamy adres IP naszego routera:
Octeon ubnt_e100# set ipaddr 10.10.1.70
Octeon ubnt_e100# set netmask 255.255.255.0

Ustawiamy adres IP servera TFTPD (http://tftpd32.jounin.net/) oraz emrk (EdgeMax Rescue Kit!) :
Octeon ubnt_e100# set serverip 10.10.1.9
Octeon ubnt_e100# set bootfile emrk-0.9c.bin

Opcjonalnie możemy ustawić naszą bramę internetową:
Octeon ubnt_e100# set gatewayip 10.10.1.254

Uruchamiamy pobieranie pliku z servera TFTPD oraz start:
Octeon ubnt_e100# tftpboot;bootoctlinux $loadaddr


Dalsza część logu:
Using octeth0 device
TFTP from server 10.10.1.9; our IP address is 10.10.1.70
Filename 'emrk-0.9c.bin'.
Load address: 0x9f00000
Loading: #################################################################
         #################################################################
         #################################################################
         #################################################################
         ##############################################
done
Bytes transferred = 15665511 (ef0967 hex), 2233 Kbytes/sec
ELF file is 64 bit
Allocating memory for ELF segment: addr: 0xffffffff81100000 (adjusted to: 0x1100000), size 0xe83940
Allocated memory for ELF segment: addr: 0xffffffff81100000, size 0xe83940
Processing PHDR 0
  Loading e23d80 bytes at ffffffff81100000
  Clearing 5fbc0 bytes at ffffffff81f23d80
## Loading Linux kernel with entry point: 0xffffffff81105ca0 ...
Bootloader: Done loading app on coremask: 0x1
#### ERROR: Unable to close pipe handle: 7
#### ERROR: Unable to shutdown usb block
Linux version 2.6.32.13-wau (dmbaturin@v-dev) (gcc version 4.3.3 (Cavium Networks Version: 2_0_0 build 95) ) #81 SMP Tue Jul 23 13:51:58 PDT 2013
CVMSEG size: 2 cache lines (256 bytes)
Cavium Networks SDK-2.0
bootconsole [early0] enabled
CPU revision is: 000d0601 (Cavium Octeon+)
Checking for the multiply/shift bug... no.
Checking for the daddiu bug... no.
Determined physical RAM map:
 memory: 000000000067b000 @ 00000000018b5000 (usable after init)
 memory: 0000000006000000 @ 0000000002000000 (usable)
 memory: 0000000007c00000 @ 0000000008200000 (usable)
 memory: 000000000fc00000 @ 0000000410000000 (usable)
Wasting 354200 bytes for tracking 6325 unused pages
Initrd not found or empty - disabling initrd
Zone PFN ranges:
  DMA32    0x000018b5 -> 0x00100000
  Normal   0x00100000 -> 0x0041fc00
Movable zone start PFN for each node
early_node_map[4] active PFN ranges
    0: 0x000018b5 -> 0x00001f30
    0: 0x00002000 -> 0x00008000
    0: 0x00008200 -> 0x0000fe00
    0: 0x00410000 -> 0x0041fc00
Cavium Hotplug: Available coremask 0x2
PERCPU: Embedded 8 pages/cpu @a8000000027b8000 s11648 r0 d21120 u65536
pcpu-alloc: s11648 r0 d21120 u65536 alloc=16*4096
pcpu-alloc: [0] 0
Built 1 zonelists in Zone order, mobility grouping on.  Total pages: 63455
Kernel command line:  bootoctlinux $loadaddr console=ttyS0,115200
PID hash table entries: 1024 (order: 1, 8192 bytes)
Dentry cache hash table entries: 32768 (order: 6, 262144 bytes)
Inode-cache hash table entries: 16384 (order: 5, 131072 bytes)
Primary instruction cache 32kB, virtually tagged, 4 way, 64 sets, linesize 128 bytes.
Primary data cache 16kB, 64-way, 2 sets, linesize 128 bytes.
Memory: 475308k/489964k available (3808k kernel code, 14444k reserved, 4082k data, 6636k init, 0k highmem)
Hierarchical RCU implementation.
NR_IRQS:152
Calibrating delay loop (skipped) preset value.. 1000.00 BogoMIPS (lpj=5000000)
Security Framework initialized
Mount-cache hash table entries: 256
Checking for the daddi bug... no.
Brought up 1 CPUs
NET: Registered protocol family 16
bio: create slab <bio-0> at 0
SCSI subsystem initialized
usbcore: registered new interface driver usbfs
usbcore: registered new interface driver hub
usbcore: registered new device driver usb
Switching to clocksource OCTEON_CVMCOUNT
NET: Registered protocol family 2
IP route cache hash table entries: 2048 (order: 2, 16384 bytes)
IPv4 FIB: Using LC-trie version 0.409
TCP established hash table entries: 8192 (order: 5, 131072 bytes)
TCP bind hash table entries: 8192 (order: 5, 131072 bytes)
TCP: Hash tables configured (established 8192 bind 8192)
TCP reno registered
NET: Registered protocol family 1
/proc/octeon_perf: Octeon performace counter interface loaded
octeon_wdt: Initial granularity 5 Sec.
squashfs: version 4.0 (2009/01/31) Phillip Lougher
Registering unionfs 2.5.11 (for 2.6.32.55)
msgmni has been set to 928
alg: No test for cipher_null (cipher_null-generic)
alg: No test for ecb(cipher_null) (ecb-cipher_null)
alg: No test for digest_null (digest_null-generic)
alg: No test for compress_null (compress_null-generic)
alg: No test for stdrng (krng)
alg: No test for ghash (ghash-generic)
io scheduler noop registered
io scheduler cfq registered (default)
octeon_rng octeon_rng: Octeon Random Number Generator
Serial: 8250/16550 driver, 2 ports, IRQ sharing disabled
serial8250.0: ttyS0 at MMIO 0x1180000000800 (irq = 58) is a OCTEON
console [ttyS0] enabled, bootconsole disabled
loop: module loaded
mdio-octeon: probed
mdio-octeon mdio-octeon.0: Version 1.0

ERROR: You must specify a broadcast group mask.
octeon-ethernet 2.0
Interface 0 has 3 ports (RGMII)
ohci_hcd: USB 1.1 'Open' Host Controller (OHCI) Driver
OcteonUSB: Detected 1 ports
OcteonUSB OcteonUSB.0: Octeon Host Controller
OcteonUSB OcteonUSB.0: new USB bus registered, assigned bus number 1
OcteonUSB OcteonUSB.0: irq 80, io mem 0x00000000
usb usb1: configuration #1 chosen from 1 choice
hub 1-0:1.0: USB hub found
hub 1-0:1.0: 1 port detected
OcteonUSB: Registered HCD for port 0 on irq 80
Initializing USB Mass Storage driver...
usbcore: registered new interface driver usb-storage
USB Mass Storage support registered.
usbcore: registered new interface driver libusual
Probing USB hub...
hub 1-0:1.0: USB hub found
hub 1-0:1.0: 1 port detected
TCP cubic registered
Initializing XFRM netlink socket
NET: Registered protocol family 10
lo: Disabled Privacy Extensions
Mobile IPv6
IPv6 over IPv4 tunneling driver
sit0: Disabled Privacy Extensions
ip6tnl0: Disabled Privacy Extensions
NET: Registered protocol family 17
NET: Registered protocol family 15
802.1Q VLAN Support v1.8 Ben Greear <greearb@candelatech.com>
All bugs added by David S. Miller <davem@redhat.com>
L2 lock: TLB refill 256 bytes
L2 lock: General exception 128 bytes
L2 lock: low-level interrupt 128 bytes
L2 lock: interrupt 640 bytes
L2 lock: memcpy 1152 bytes
Bootbus flash: Setting flash for 4MB flash at 0x1f800000
phys_mapped_flash: Found 1 x16 devices at 0x0 in 8-bit bank
 Amd/Fujitsu Extended Query Table at 0x0040
phys_mapped_flash: Swapping erase regions for broken CFI table.
number of CFI chips: 1
cfi_cmdset_0002: Disabling erase-suspend-program due to code brokenness.
Freeing unused kernel memory: 6636k freed
Algorithmics/MIPS FPU Emulator v1.5
init started: BusyBox v1.17.1 (Debian 1:1.17.1-8)
starting pid 203, tty '': '/etc/init.d/rcS'
hub 1-0:1.0: activate --> -22
usb 1-1: new high speed USB device using OcteonUSB and address 2
usb 1-1: configuration #1 chosen from 1 choice
scsi0 : SCSI emulation for USB Mass Storage devices
eth0: 1000 Mbps Full duplex, port  0, queue  0
scsi 0:0:0:0: Direct-Access     TOSHIBA  TransMemory      PMAP PQ: 0 ANSI: 0 CCS
sd 0:0:0:0: [sda] 15240576 512-byte logical blocks: (7.80 GB/7.26 GiB)
sd 0:0:0:0: [sda] Write Protect is off
sd 0:0:0:0: [sda] Assuming drive cache: write through
 sda:
sd 0:0:0:0: [sda] Assuming drive cache: write through
sd 0:0:0:0: [sda] Attached SCSI removable disk
Loading EMRK 0.9a
Mounting filesystems
Bringing up eth0
Checking boot partition
Boot partition looks intact
Attempting to mount boot partition
mount: mounting /dev/sda1 on /mnt/boot failed: No such device or address
Could not mount boot partition!
Checking root partition
Root partition is missing or has wrong filesystem type!
**********************************************
Welcome to EdgeMax Rescue Kit!
This tool is distributed under the terms of
GNU General Public License and other licenses
Brought to you by SO3 Group
WARNING: This tool is not developed, officially
supported or endorsed by Ubiquiti Networks!
Using it may lead to destroying your router
configuration or operating system
Ubiquiti Networks support will not help you
with using it or fixing consequences of
using it.
This tool itself is distributed without any
warranty and authors are not liable for
any damage it may cause
By using this tool you agree you are doing
it at your own risk and understand what
you are doing
*********************************************
Enter 'Yes' to proceed, 'No' to reboot
yes or no: Yes

Potwierdzamy działanie narzędzia na własną odpowiedzialność wpisując Yes.

Czy chcesz skonfigurować połączenie za pomocą serwera DHCP?
Do you want to configure network via DHCP?yes or no: Yes


udhcpc (v1.17.1) started
Sending discover...
Sending select for 10.10.1.108...
Lease of 10.10.1.108 obtained, lease time 86400
/usr/share/udhcpc/default.script: Resetting default routes
route: SIOCDELRT: No such process
/usr/share/udhcpc/default.script: Adding DNS 10.10.1.254
EMRK provides some scripts for automated
recovery procedures:
emrk-factory-reset -- reset config to factory default
emrk-remove-user-data -- remove all the user data including
    config and everything
emrk-reinstall -- reinstall EdgeOS from scratch
    (wipes any user data too)
Enter 'reboot' to reboot your router

BusyBox v1.17.1 (Debian 1:1.17.1-8) built-in shell (ash)
Enter 'help' for a list of built-in commands.
/bin/ash: can't access tty; job control turned off
EMRK>emrk-reinstall 
Wpisujemy emrk-reinstall aby przeinstalować nasz system od zera.


WARNING: This script will reinstall EdgeOS from scratch
If you have any usable data on your router storage,
it will be irrecoverably destroyed!
Do you want to continue?
yes or no: yes
Re-creating partition table
Creating boot partition
Formatting boot partition
mkfs.vfat 3.0.9 (31 Jan 2010)
Creating root partition
Formatting root partition
Mounting boot parition
Mounting root partition
kjournald starting.  Commit interval 5 seconds
EXT3 FS on sda2, internal journal
EXT3-fs: mounted filesystem with writeback data mode.
Enter EdgeOS image url: http://dl.ubnt.com/firmwares/edgemax/v1.9.1/ER-e100.v1.9.1.4939093.tar
Podajemy adres do najnowszej wersji oprogramowania ze strony:
https://www.ubnt.com/download/edgemax/edgerouter-lite/erlite3 
  % Total    % Received % Xferd  Average Speed   Time    Time     Time  Current
                                 Dload  Upload   Total   Spent    Left  Speed
100 82.9M  100 82.9M    0     0  13.2M      0  0:00:06  0:00:06 --:--:-- 14.2M
Unpacking EdgeOS release image
Verifying EdgeOS kernel
Copying EdgeOS kernel to boot partition
Verifying EdgeOS system image
Copying EdgeOS system image to root partition
Copying version file to the root partition
Creating EdgeOS writable data directory
Cleaning up
Installation finished
Please reboot your router
EMRK>reboot
Restartujemy router wpisując reboot.

starting pid 280, tty '': '/bin/umount -a -r'
The system is going down NOW!
Sent SIGTERM to all processes
Sent SIGKILL to all processes
Requesting system reboot
Restarting system.
Looking for valid bootloader image....
Jumping to start of image at address 0xbfc80000

U-Boot 1.1.1 (UBNT Build ID: 4493936-g009d77b) (Build time: Sep 20 2012 - 15:48:51)
BIST check passed.
UBNT_E100 r1:2, r2:14, serial #: DC9FDB286268
Core clock: 500 MHz, DDR clock: 266 MHz (532 Mhz data rate)
DRAM:  512 MB
Clearing DRAM....... done
Flash:  4 MB
Net:   octeth0, octeth1, octeth2
USB:   (port 0) scanning bus for devices... 1 USB Devices found
       scanning bus for storage devices...
  Device 0: Vendor: TOSHIBA  Prod.: TransMemory      Rev: PMAP
            Type: Removable Hard Disk
            Capacity: 7441.6 MB = 7.2 GB (15240576 x 512)
 0
reading vmlinux.64
..................................
6882440 bytes read
argv[2]: coremask=0x3
argv[3]: root=/dev/sda2
argv[4]: rootdelay=15
argv[5]: rw
argv[6]: rootsqimg=squashfs.img
argv[7]: rootsqwdir=w
argv[8]: mtdparts=phys_mapped_flash:512k(boot0),512k(boot1),64k@3072k(eeprom)
ELF file is 64 bit
Allocating memory for mapped kernel segment, alignment: 0x400000
Allocated memory for ELF segment: addr: 0x400000, size 0x7de180
Processing PHDR 0
  Loading 68ee80 bytes at 400000
  Clearing 14f300 bytes at a8ee80
## Loading Linux kernel with entry point: 0x008ec0c0 ...
Bootloader: Done loading app on coremask: 0x3
Linux version 3.10.20-UBNT (root@ubnt-builder2) (gcc version 4.7.0 (Cavium Inc. Version: SDK_3_1_0_p2 build 34) ) #1 SMP Fri Dec 2 02:30:08 PST 2016
CVMSEG size: 2 cache lines (256 bytes)
Cavium Inc. SDK-3.1
bootconsole [early0] enabled
CPU revision is: 000d0601 (Cavium Octeon+)
Checking for the multiply/shift bug... no.
Checking for the daddiu bug... no.
Determined physical RAM map:
 memory: 0000000007400000 @ 0000000000c00000 (usable)
 memory: 0000000007c00000 @ 0000000008200000 (usable)
 memory: 000000000fc00000 @ 0000000410000000 (usable)
 memory: 000000000064c000 @ 0000000000400000 (usable)
 memory: 0000000000044000 @ 0000000000a4c000 (usable after init)
Wasting 57344 bytes for tracking 1024 unused pages
software IO TLB [mem 0x01707000-0x01747000] (0MB) mapped at [8000000001707000-8000000001746fff]
Zone ranges:
  DMA32    [mem 0x00400000-0xefffffff]
  Normal   [mem 0xf0000000-0x41fbfffff]
Movable zone start for each node
Early memory node ranges
  node   0: [mem 0x00400000-0x00a8ffff]
  node   0: [mem 0x00c00000-0x07ffffff]
  node   0: [mem 0x08200000-0x0fdfffff]
  node   0: [mem 0x410000000-0x41fbfffff]
Primary instruction cache 32kB, virtually tagged, 4 way, 64 sets, linesize 128 bytes.
Primary data cache 16kB, 64-way, 2 sets, linesize 128 bytes.
Secondary unified cache 128kB, 8-way, 128 sets, linesize 128 bytes.
PERCPU: Embedded 10 pages/cpu @8000000001784000 s11904 r8192 d20864 u40960
Built 1 zonelists in Zone order, mobility grouping on.  Total pages: 125887
Kernel command line:  bootoctlinux $loadaddr coremask=0x3 root=/dev/sda2 rootdelay=15 rw rootsqimg=squashfs.img rootsqwdir=w mtdparts=phys_mapped_flash:512k(boot0),512k(boot1),64k@3072k(eeprom) console=ttyS0,115200
PID hash table entries: 2048 (order: 2, 16384 bytes)
Dentry cache hash table entries: 65536 (order: 7, 524288 bytes)
Inode-cache hash table entries: 32768 (order: 6, 262144 bytes)
Memory: 495244k/510528k available (5090k kernel code, 15284k reserved, 1354k data, 272k init, 0k highmem)
Hierarchical RCU implementation.
        Additional per-CPU info printed with stalls.
NR_IRQS:255
Calibrating delay loop (skipped) preset value.. 1000.00 BogoMIPS (lpj=5000000)
pid_max: default: 32768 minimum: 501
Security Framework initialized
Mount-cache hash table entries: 256
Checking for the daddi bug... no.
SMP: Booting CPU01 (CoreId  1)...
CPU revision is: 000d0601 (Cavium Octeon+)
Brought up 2 CPUs
NET: Registered protocol family 16
bio: create slab <bio-0> at 0
SCSI subsystem initialized
usbcore: registered new interface driver usbfs
usbcore: registered new interface driver hub
usbcore: registered new device driver usb
Switching to clocksource OCTEON_CVMCOUNT
NET: Registered protocol family 2
TCP established hash table entries: 4096 (order: 4, 65536 bytes)
TCP bind hash table entries: 4096 (order: 4, 65536 bytes)
TCP: Hash tables configured (established 4096 bind 4096)
TCP: reno registered
UDP hash table entries: 256 (order: 1, 8192 bytes)
UDP-Lite hash table entries: 256 (order: 1, 8192 bytes)
NET: Registered protocol family 1
octeon_pci_console: Console not created.
/proc/octeon_perf: Octeon performance counter interface loaded
HugeTLB registered 2 MB page size, pre-allocated 0 pages
squashfs: version 4.0 (2009/01/31) Phillip Lougher
Registering unionfs 2.5.13 (for 3.10.34)
msgmni has been set to 967
io scheduler noop registered
io scheduler cfq registered (default)
Serial: 8250/16550 driver, 6 ports, IRQ sharing disabled
1180000000800.serial: ttyS0 at MMIO 0x1180000000800 (irq = 34) is a OCTEON
console [ttyS0] enabled, bootconsole disabled
1180000000c00.serial: ttyS1 at MMIO 0x1180000000c00 (irq = 35) is a OCTEON
loop: module loaded
ehci_hcd: USB 2.0 'Enhanced' Host Controller (EHCI) Driver
ohci_hcd: USB 1.1 'Open' Host Controller (OHCI) Driver
OcteonUSB 16f0010000000.usbc: Octeon Host Controller
OcteonUSB 16f0010000000.usbc: new USB bus registered, assigned bus number 1
OcteonUSB 16f0010000000.usbc: irq 56, io mem 0x00000000
hub 1-0:1.0: USB hub found
hub 1-0:1.0: 1 port detected
OcteonUSB: Registered HCD for port 0 on irq 56
usbcore: registered new interface driver usb-storage
octeon_wdt: Initial granularity 5 Sec
TCP: cubic registered
NET: Registered protocol family 17
NET: Registered protocol family 15
Bootbus flash: Setting flash for 4MB flash at 0x1f800000
phys_mapped_flash: Found 1 x16 devices at 0x0 in 8-bit bank. Manufacturer ID 0x0000c2 Chip ID 0x0000a7
Amd/Fujitsu Extended Query Table at 0x0040
  Amd/Fujitsu Extended Query version 1.1.
phys_mapped_flash: Swapping erase regions for top-boot CFI table.
number of CFI chips: 1
3 cmdlinepart partitions found on MTD device phys_mapped_flash
Creating 3 MTD partitions on "phys_mapped_flash":
0x000000000000-0x000000080000 : "boot0"
0x000000080000-0x000000100000 : "boot1"
0x000000300000-0x000000310000 : "eeprom"
Waiting 15sec before mounting root device...
usb 1-1: new high-speed USB device number 2 using OcteonUSB
usb-storage 1-1:1.0: USB Mass Storage device detected
scsi0 : usb-storage 1-1:1.0
scsi 0:0:0:0: Direct-Access     TOSHIBA  TransMemory      PMAP PQ: 0 ANSI: 0 CCS
sd 0:0:0:0: [sda] 15240576 512-byte logical blocks: (7.80 GB/7.26 GiB)
sd 0:0:0:0: [sda] Write Protect is off
sd 0:0:0:0: [sda] No Caching mode page found
sd 0:0:0:0: [sda] Assuming drive cache: write through
sd 0:0:0:0: [sda] No Caching mode page found
sd 0:0:0:0: [sda] Assuming drive cache: write through
 sda: sda1 sda2
sd 0:0:0:0: [sda] No Caching mode page found
sd 0:0:0:0: [sda] Assuming drive cache: write through
sd 0:0:0:0: [sda] Attached SCSI removable disk
kjournald starting.  Commit interval 3 seconds
EXT3-fs (sda2): using internal journal
EXT3-fs (sda2): mounted filesystem with journal data mode
VFS: Mounted root (unionfs filesystem) on device 0:11.
Freeing unused kernel memory: 272K (ffffffffc064c000 - ffffffffc0690000)
Algorithmics/MIPS FPU Emulator v1.5
INIT: version 2.88 booting
INIT: Entering runlevel: 2
[....] Starting routing daemon: rib nsm ribd. ok
[....] Starting EdgeOS router: migrate rl-system configure. ok
Welcome to EdgeOS ubnt ttyS0
By logging in, accessing, or using the Ubiquiti product, you
acknowledge that you have read and understood the Ubiquiti
License Agreement (available in the Web UI at, by default,
http://192.168.1.1) and agree to be bound by its terms.
ubnt login: ubnt
Password: 
Logujemy się używając domyślnego loginu i hasła ubnt/ubnt. Konfigurujemy przydział adresu na porcie eth0 z DHCP.

Linux ubnt 3.10.20-UBNT #1 SMP Fri Dec 2 02:30:08 PST 2016 mips64
Welcome to EdgeOS

ubnt@ubnt:~$ configure
ubnt@ubnt# delete interfaces ethernet eth0 address 192.168.1.1/24
ubnt@ubnt# set interfaces ethernet eth0 address dhcp
ubnt@ubnt# commit

[ interfaces ethernet eth0 address dhcp ]
Starting DHCP client on eth0 ...

ubnt@ubnt# save

Saving configuration to '/config/config.boot'...
Done

ubnt@ubnt# run show interfaces ethernet
Codes: S - State, L - Link, u - Up, D - Down, A - Admin Down
Interface    IP Address                        S/L  Description                
---------    ----------                        ---  -----------                
eth0         10.10.1.103/24                    u/u                            
eth1         -                                 u/D                            
eth2         -                                 u/D        
Logujemy się na nasz router z adresu otrzymanego za pomocą serwera DHCP.

Rysunek 4 - Strona startowa EdgeMAX
Wszystko zostało pomyślnie zainstalowane teraz tylko trzeba przerobić pendrive aby się schował w obudowie. U mnie wygląda to tak:

Rysunek 5 - Router EdgeMAX od środka z zmodyfikowanym pendrive.
Podsumowując kupiłem uszkodzony router za 50zł + przewód consolowy RJ45->RS232 10zł + pendrive 8GB Toshiba (posiadałem) zyskałem sprzęt wart kilkaset złotych.

Rysunek 6 - EdgeMAX Lite po reanimacji